How to land a plane without the engine

For some fascinating reading, check out Gene’s Top Ten List of Pilot Killers. The list is full of good advice and warnings (all quite sobering, given the fatalities mentioned).

Item 6 (“Failure to maintain proficiency”) in particular gave me food for thought. It’s easy to assume that you’re as proficient now as the day you got your license. When was the last time you practiced a (simulated) emergency while driving your car? (e.g., tire blowout, run out of gas, pedestrian runs in front of your car) Was this even covered in your driver’s ed course? For pilots, how often should one practice such simulations in a plane, after getting a license?

I’ve now had the “opportunity” to practice landing after an engine failure. This sounds terrifying, but actually it was empowering. I got to see how the plane behaves with no engine power, and stay in control and survive it.

We were flying along at 1300 ft when my instructor pulled the throttle to idle and said, “Ok, land the plane.” We’d covered the process, and he coached me through it, so I wasn’t completely on my own. And in this simulation, we don’t actually turn the engine off. “The first rule of emergency simulations,” he said, “is don’t make the simulation into a real emergency.” With the throttle at idle, the propeller keeps spinning, but there’s no thrust powering the plane — instead, the wind is turning the propeller freely.

The first thing you do is get the airplane positioned for its “best glide speed.” I was surprised to learn that airplanes do glide. They can make a good amount of distance even with no propeller power. They aren’t *great* at it, but it’s enough to get you down safely if you stay in control. For this plane, that speed is 80 mph.

Next, you look around for a good landing spot. Since we were flying the airport pattern, our best landing option was… the runway, half a mile off to the right.

Next, you do some standard checks to see if there’s an obvious, correctable problem with the engine. Does it have fuel? Is the mixture rich enough? Is carburetor heat on? Are both magnetos selected? Is the primer locked?

Assuming that none of these fixed the problem, we practiced a forced landing. We were already cleared to land, so we began a gentle curve to bring us around to the runway, keeping an eye (as usual) on airspeed, descent rate, and altitude. We were a little high even with no power, so we put flaps on to increase drag and help us slow down and descend. When we were close enough, I adjusted closer to the regular landing speed (70 mph) by raising the nose and then glided in. I think this was less scary than it might have been because we normally deliberately take the engine to idle just before landing. But the ability of the plane to not fall out of the sky even without engine power was eye-opening to me, in a good way.

This was a great experience, and in conjunction with Gene’s list of Pilot Killers, I now wondering how often one should practice this kind of simulation even after you’re licensed and flying on your own. Pull the throttle to idle on purpose and make sure you remember how to get down safely? Maybe a good idea!

Harry Potter en español

I picked up the first Harry Potter book, in Spanish, as a fun opportunity to practice (and improve) my Spanish skills. The writing level is a bit above my current reading level, but it’s fun to be pushed a little, and my vocabulary is definitely benefiting.

Reading this translation also raises interesting questions about the translation process — which is one of those topics that you think you understand until you think about it a bit more.

Some American readers will be amused by the Spanish title, which is “Harry Potter y la piedra filosofal” (the Philosopher’s Stone) — which is the literal title in British English, but not the American one. It was changed to “the Sorcerer’s Stone” apparently due to expectations that “philosopher” would not appeal to American children, and that they wouldn’t know what the Philosopher’s Stone was.

Chapter 1 is titled “El niño que vivió”, which again is literally the same as in English: “The boy who lived.” However, the verb “vivir” in Spanish doesn’t quite have the nuance that “live” does in English (that it can also mean “survive”), so it probably comes across a bit oddly to Spanish readers.

The first sentence includes a bigger translation gap. The English reads:

Mr. and Mrs. Dursley, of number four, Privet Drive, were proud to say that they were perfectly normal, thank you very much.

That final phrase (“thank you very much”) is a clever injection of the characters’ voices into what is otherwise simple narration — a charming bit that apparently wasn’t translatable. The Spanish version replaces this phrase with “afortunadamente” (“fortunately”), which gets the meaning across, but loses the charm.

One of the other large gaps is in dialect. Hagrid appears near the end of this chapter, with his rough, uneducated dialect (e.g., “Lily an’ James dead — an’ poor little Harry off ter live with Muggles”). Apparently this is hard or impossible to convey in Spanish, so he sounds (as far as my limited ear can tell) like a normal person: “Lily y James muertos… y el pobrecito Harry tendrá que vivir con muggles” (“Lily and James dead… and poor little Harry has to live with Muggles”).

There is one place where the translation, I think, improves on the original. When Albus Dumbledore walks along Privet Drive, putting out street lamps with a silver lighter, that lighter is called the “Put-Outer” in English, which is awkward and clunky. (One thing Rowling is generally very good at is coining apt and elegant names, so this stands out.) In Spanish, it is the Apagador, from the verb “apagar” (to put out, turn off, extinguish), and that has such a better feel to it!

I’m up to chapter 5 now, make slow but enjoyable progress. Once I finish this book, I want to move on to some books at a similar level that were originally written in Spanish. That should give much more of a “real” feel for the language, without the obstacles posed by translation.

Flying to a new airport

At my most recent flying lesson, we flew to a new airport. I’d read up on what would be involved, but didn’t anticipate the amount of complexity! It was as if we’d been driving around the parking lot (to practice takeoffs and landings) and suddenly we turned on to the freeway to drive to the next town. (The next block is probably a more apt metaphor, but right now the jump feels extreme.)

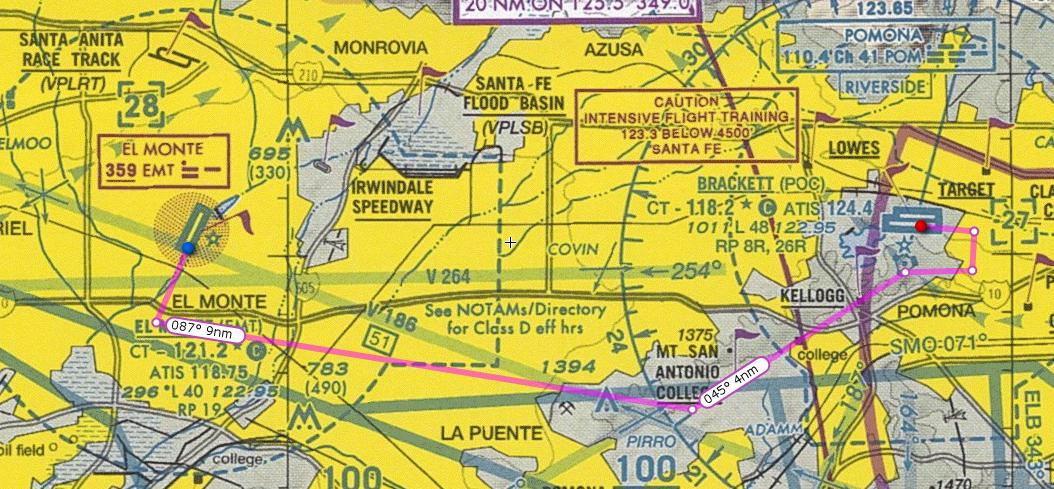
Here is the route we took. It’s about 13 miles of total flying from El Monte (my home airport) to Brackett (which felt like another planet).

We flew south of the 10 freeway at 2300 ft, then angled northeast towards Brackett. This looks really obvious and clear on a map. It is distinctly harder to navigate in the air, while things are moving, with an L.A.-style hazy soup lying over everything. Thank goodness I live here, so I could recognize the freeways from ground experience.

The distance between the airports is short enough that you have to really be on the ball. As soon as you leave El Monte airspace, you have to switch over to Brackett’s ATIS (Automatic Terminal Information Service) to listen to weather conditions at Brackett. That way, when you call Brackett to request permission to land, you can indicate that you’re up to date on those conditions. So you’re flying along, keeping an eye on your airspeed (~100 knots) and altitude (2300) and heading while listening to the radio while scribbling down the ATIS notes.

All too soon, you’re ready to enter the Brackett pattern, which like El Monte is 1000 ft above the ground, except that the ground is distinctly higher here (1000 ft instead of 300 ft). So you’re aiming for an altitude of 2000 instead of 1300, and all the ground references look wrong/different (because they are). However, we managed to land, and then do our regular pattern work of takeoffs and landings (with totally different visual references than at El Monte, plus it’s a left-turning pattern instead of right-turning. So many new things!).

Brackett’s control tower was quite busy that day, because there was an airshow going on to the north and they had to manage traffic diverting around that. A couple of times, we had to extend our approach (downwind) because the tower was too busy talking to other people to clear us to land. Meanwhile, my instructor called out helpful/distracting things like “watch out for that flock of birds”, and at one point I spied a blimp to the north (part of the airshow?), and Brackett has two parallel runways, so I had to be super careful turning for final approach. My instructor also threw in a surprise touch-and-go (arrrgh!) which led to a rather embarrassing fishtailing takeoff on my part (but he claimed it was “good enough because the centerline never got out from under your wings” (!)) and a soft field takeoff (the terrifying one where you take off a few feet and then try to fly really low along the runway — which, oddly, feels like you’re diving at the ground). However, I managed communications okay (with coaching when new/unexpected things happened).

My brain was definitely full (or over-full) from that lesson! Next time, we’ll be back at El Monte and practicing takeoffs/landings. My instructor says he likes to alternate between pushing students outside their comfort zones and returning to the comfort zone to solidify things. Here’s hoping. :)

In other news, I just crossed the 10-hour mark in terms of my total flight time!

How to land a plane

If you really wish to learn then you must mount the machine and become acquainted with its tricks by actual trial.
— Wilbur Wright

My last two lessons have consisted of takeoff and landing drills. We follow a set pattern of takeoff, climb (“upwind”), turn right (“crosswind”), parallel the runway (“downwind”), turn right (“base”), and land (“final”), over and over again. This is a bit like circling the block to practice parallel parking, except that it happens at 65 mph and you can die if you do it wrong.

It’s a bit difficult to articulate what is learned, intellectually, from these drills, because although the plane’s manual has recommended speeds for each stage of this pattern, my instructor discourages the obvious tendency to stare at the airspeed indicator and instead urges getting a “feel” for different plane attitudes and speeds, by repetition. In fact, this time he whipped out a round post-it note and used it to completely cover the airspeed indicator so that I couldn’t use it except when he allowed confirmatory peeks. :)

However, here is a summary of things you have to think about while flying this sort of practice pattern:

  • Attitude (pitch) of the airplane. Be especially mindful when banking (turning) and when adding/reducing flaps (both affect attitude and therefore airspeed and lift).
  • Airspeed. At these low speeds, bring the nose up to slow down and push the nose down to speed up.
  • Altitude. Get 500 ft above the ground before turning crosswind, level out at 1000 ft, then descend.
  • Glide path for landing. Use yoke (attitude) to manage airspeed (60-65 mph) and throttle to manage altitude (more power to come up, less power to come down). Judge your path visually by whether the runway numbers are sliding forward (you’re too low) or sliding back/under you (too high). There are also some handy approach slope indicator (ASI) lights that change color if you’re too high or too low, but this can be deceptive since it’s an instantaneous measure and the plane is moving. Vital for night landings, though, which I have yet to experience.
  • Spotting other planes. Also birds.
  • Communications. If the tower is talking to you, you should listen (and may need to reply). At first I didn’t hear our callsign at all when I was flying the plane, because I was too busy flying the plane. Now I hear it about 50% of the time. I guess this is a measure of cognitive load. :)

After several landings, my instructor apparently decided it was time for something new. While I was (am) not yet 100% satisfied with my performance, he started throwing curve balls and changing things, including:

  • Soft-field takeoff: Put on 10 degrees of flaps, pull the yoke all the way back, and lift off immediately, then fly low and level until you get enough speed to climb (because of ground effect, you need more speed to climb than to lift off). The start is basically like popping a wheelie in a plane, which feels a bit odd (but is quite like landing, actually). And flying low and level is (for me, right now) even more scary than landing the plane. When I push the nose down the amount my instructor says, it feels like we’re diving back down at the runway. I suppose this is an illusion and I’ll get over it.
  • Touch and go: We got all the way in and touched down and I was about to relax and start braking when my instructor said “Full throttle!” and we were taking off again. He retracted the flaps, and I pushed the throttle all the way in, pulled the carb heat off, and climbed back up into the sky, albeit not as smoothly as my regular takeoffs. Nerves.
  • Go around: Even worse. We got all the way in and were ABOUT to touch down (like 10 feet off the runway) when my instructor said “Full throttle!” and we were taking off again. So, full throttle and carb heat off. But for this one you have to slowly take the flaps off lest you suddenly lose too much lift and rejoin the ground (going way too fast and no longer set up for a landing). And while you’re slowly retracting the flaps, you have to constantly adjust your attitude and trim, keep an eye on the airspeed, watch where you’re climbing to, and be mindful of that turn coming up at 500 ft.
  • Left closed traffic: On our final takeoff, the tower instructed me to go left instead of right (presumably to avoid traffic). Every other takeoff was a right turn, so all of my landmarks were suddenly different, and the runway was on the other side, and it felt distinctly odd, but a good mental exercise. My instructor: “I didn’t even have to ask him to do that!”

On one of my landings, we had a small bounce, so it felt like landing twice. My instructor said it still only counts as one landing for my logbook, though.

On another landing, we ballooned — meaning I pulled up too much as we were coming in, so instead of leveling out, we started going back up. This sounds like no big deal, since you can always go back down (up is harder), but apparently it can be quite dangerous. You have to relax your pull on the yoke (to let the nose settle back down) but then pull even harder to get it back into a nose-up flare position before you touch down. Since more time has elapsed, you’ve lost more speed, so the plane will descend faster. There’s also a chance that the balloon could turn into a stall (if you slow enough and the nose is up) while you’re still a bit high from the runway, also causing a rough landing. If the balloon is too great, you should convert to a go-around. You have to make a split-second decision on this one (like if you’re approaching an intersection and the green light turns yellow and you decide whether to slow and stop or keep going, but rather higher stakes).

For my next lesson, we’re going to go somewhere! We will fly to a different airport, so I can try an entirely new environment, landmarks, etc.