Modern day logging sports

Today I got to observe a Logging Sports Competition hosted by the Oregon State University Forestry Club. I had noticed the logging sports arena at Peavy Arboretum during a hike there and was eager to come back and see it in action!

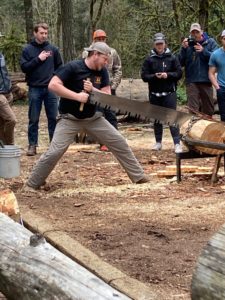
The first event was buck sawing, in which each contestant had to push and pull a “peg and raker cross-cut saw” to slice through a log. Some make it look easy, and others showed how hard it was! Both of these folks were aces:

Next was the “choker race”, in which contestants had to carry a choker (a flexible cable apparently used for hauling large logs) with them through an obstacle course. They had to scramble/leap over a massive downed log (6′ in diameter), then find and unhook their choker from another 4′ log, then climb over a pile of 3 logs, then jump over a low beam, then trace their way back and reattach the choker around the 4′ diameter log.

Then teams competed in the pulp toss, where they alternated throwing logs back and forth (as with horseshoes, but so much heavier). The teams each had one lumberjack and one lumberjill :)

Next was a chainsaw event (with chaps, safety goggles, and earplugs, but no gloves (?)). And then was the horizontal chopping event, wow! The precision and efficacy of these axe blows were very impressive. Yes, they are chopping right between their feet.

Amusingly, I recently watched an episode of Little House on the Prairie (“Founder’s Day”, 1975) in which they had the same wood-chopping competition!

The final event I watched was the axe throw – I’m amazed that this is even possible, to hurl an axe end-over-end and have it stick into a wood target 20 feet away.

Overall I was impressed by the difficulty of these challenges and the skills displayed. I wish I could have seen birling (log rolling) too!

How to hang glide

Yesterday I got to hang glide for the first time. Windsports Hang Gliding offers introductory lessons at Dockweiler Beach. Under the guidance of an instructor, you get to launch and sail out over the sand dunes on your own!

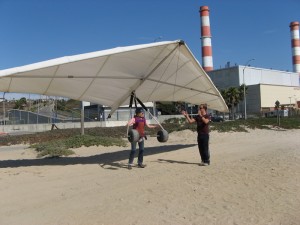
For my first few flights, the instructor served as a set of training wheels as well as a source of useful shouted instructions. He held on to one side of the glider and kept it stable until I got a feel for its motion. A 30-foot wingspan makes it quite unwieldy to manipulate unless you’re working with the wind and can sense the glider’s position through your body. Here I’m learning how to stabilize the glider, before launching, which at that point genuinely feels like having a giant kite strapped to your back (I’m clipped in behind my back via carabiner).


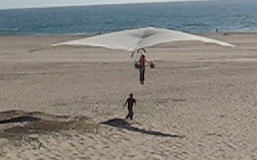
Next, you run forward and launch off the hill. Running is harder than it sounds, since the glider immediately wants to lift you up, at which point you lose the ability to run. You have to hold it down until the right moment when it lifts you (so smoothly) upward.


Pushing the bar forward shifts your weight back relative to the glider and makes it climb (and slow). Pulling the bar towards you does the opposite (and makes you go faster). Turning is not accomplished by any kind of leaning. Instead, you pull the right bar towards you to turn right, and pull the left bar to turn left. This makes sense, as it simply moves your body weight around and controls the kiteglider with simple physics.

Except it takes a while to figure out how to implement this. You only need to pull briefly, then return to center, and a second or so later, the glider responds with a turn. That kind of delayed response is initially challenging to deal with. Everyone in the class over-steered, holding the bar until the glider actually turned, which is when you want to already be back in a neutral position (unless you’re aiming for a real bank, not just a bit of trim). Apparently for an even stronger turn, you can yaw the glider (make it pivot around its vertical axis) by pushing outward with the non-pulling hand, but I didn’t get to try this.

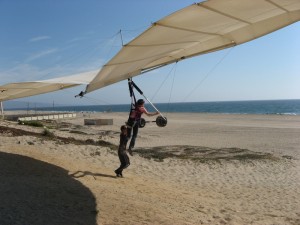
Here I am up in the air, with the helpful instructor trotting below and giving instructions:


You land by losing altitude (natch) and, just at the end, pushing the bar out to raise the nose, slow the glider, and give you a gentle stop as you land on your feet. One time I forgot to do this, or did it too late, and landed dragging my knees, which was amusing rather than painful (beach sand!).

Overall, this was a surprisingly tame experience. There wasn’t one moment when I thought “yikes!” The glider moves so smoothly that you barely notice you’re off the ground. No crashes, no calamities. Our instructor commented that hang gliding is no longer considered an extreme sport (!). There are, of course, still accidents and casualties. One source says that the chance of dying while hang-gliding is 1 in a thousand pilots, which seems extremely high. But this is calculated over “regularly participating pilots beyond the student level”; apparently there are very few student casualties. A U.K. source, however, reports a rate of 1 in 116,000 flights (and note that the risk of dying from childbirth is an order of magnitude higher, at 1 in 8,200 maternities). Hmm.

Each of our flights were about 30 seconds long (so short!). The same company offers tandem glides off a cliff, where you get 15-minute flights and, presumably, much more time to actually to feel the glider’s response. Tempting!

Triathlon Triumph

Today I ran, biked, and swam in my first triathlon. The Pasadena Triathlon is a reverse sprint, so the distances are much shorter than a regular (Olympic-length) triathlon, and the events occur in the reverse order. Our task for the day was to run 5 km, then bike 15 km, then swim 150 m. I was most worried about the swim, as that is certainly my weakest event right now!

I arrived at 6:30 a.m., an hour and a half before the race start, and had no trouble setting up my transition area, where I would return between events to swap gear. It was very chilly at first, and we were all grateful when the sun finally came up. I was lucky enough to have two friends there to help the time pass quickly: Vali, my race buddy who was competing in the much-harder duathlon (5K run + 15K bike + another 5K run), and Evan, my triathlete friend who got me to sign up in the first place (and who took pictures and carried my stuff around and shouted encouragement at every turn!).

The hardest part of the morning might have been the final 15 minutes before race start! I kept wanting to warm up, but not too much in advance, and itching to just get going. But finally we started off. At first it was slow going because there were so many people in the “women under 40” group, but we eventually spread out and the running felt great. I enjoyed following along behind two women who were wearing tutus (easy to spot!). The run was uneventful aside from one of the tutu-wearing women tripping in front of me. She recovered with a nice roll and was back on her feet immediately.

After the run, I pulled on my helmet, gloves, and hydration backpack. I know the latter is utterly uncool, but since I was riding a mountain bike, I’d already given up any cool gear points. :) And the backpack worked great! I had all of my tire-changing supplies in there (thankfully never needed) and I never got too thirsty. Worth the weight, for me. I got brave enough to call out “Yay, mountain bikes!” to another woman riding one, and we had a brief breathless exchange (she also had a hydration pack, and she volunteered that she too most feared the upcoming swim!).

Three loops around the Rose Bowl went by quickly on the bike — or it felt that way (it actually took more total time than the single-loop run). Each loop seemed to go faster than the one before, according to my bike computer, the opposite of what I expected. I zoomed back to the transition area and got my first surprise when I dismounted the bike. You’re meant to keep jogging so you don’t clog the dismount channel, but if I hadn’t been holding the bike as I staggered along, I’d have fallen flat on my face! My left leg immediately cramped and I couldn’t seem to move my legs properly. Everyone says that the bike to run transition is hard — I guess that’s what that was! Happily, I recovered by the time I got to my bike rack. I pulled off my helmet, backpack, shirt, and shorts, pulled on my swim cap, grabbed my goggles, and ran. It’s about 200 meters from the transition area to the pool, over rocks and grass, and I was so glad I’d left my sneakers on!
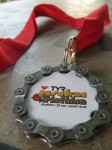
Then it was into the pool, and I just went for it. I actually wasn’t as tired as I’d feared I’d be, and although the 150 meters were *long*, it was overall less effort than one of my standard 30-minute attempts at lap swims. I did have to alternate between the front crawl and swimming on my back, as I grew more tired, but I didn’t drown and I actually passed a person or two (!). I staggered out of the pool and happily accepted my medal (a neat one with a bike chain around the perimeter!).

Overall, it was a fantastic experience. I accomplished something I considered beyond my abilities just a few months ago. I really felt that my training paid off, and I was neither exhausted nor in pain at the end of the race. And contrary to what we’d been told to be prepared for, nothing went wrong! No gear failed, no important item was forgotten, I didn’t fall, I survived the swim. I could definitely see myself doing this again — and maybe even improving my time!
Archery

Recently I’ve had the pleasure of attending some instructional sessions held by the Pasadena Roving Archers near the Rose Bowl. I took an archery class way back when, in grad school, but it’s been a long time. Luckily, the PRA welcomes anyone to a free introductory lesson, on Saturdays from 8:30 to 10 a.m. Sounds simple… but this is such a popular event that you have to arrive well before 8:30. More like 7:30, to get on the list and wait for an hour to see if you get in. (It took me two tries!)

The introductory lesson starts with a quick sighting test to determine your dominant eye, so that you can pick up a left- or right-handed bow as appropriate. You then strap on a forearm bracer (to avoid bowstring welts) and a bit of leather to protect the fingers used to draw the bow, and off you go. In small groups of six people, we learned some safety rules and then got to start shooting at a target 10 yards distant. After an hour or so of practice, we all joined up at the big range and shot as a crowd.

In a group of people armed with bows, some coordination is critical. In this setting, it is done with a whistle:

  • Two blasts: step up to straddle the firing line, bow vertical with one tip resting on your shoe.
  • One blast: draw and nock your first arrow and start firing. When done, move back from the line.
  • Three blasts: everyone’s done firing, so you can approach your target and start extracting arrows.

Arrows are removed with a certain careful combination of safety and etiquette. Two archers are permitted at the target at any time, off to the side (never standing in front of it, where a misstep could conceivably lead you to fall onto the arrows). Archers with their arrows furthest from the bullseye go first, as those are the most accessible. Therefore, the best archers are the ones loitering around until the last. If another archer’s arrow is in your way, and it fell outside the paper (scoring) part of the target, you may remove it and stand it up, point down, leaning against the target. Otherwise you leave them where they are. If you need to get arrows from the other side of the target, you can call “switch” and switch sides with the other person, marking out a large berth around the pointy arrows still in the target.

The PRA also allows you to come back for subsequent class/practice sessions, which are held on Saturdays from 10:30 to noon, available to anyone who’s completed the first class and is willing to pay $5. Totally worth it! You get 4 arrows to shoot repeatedly for an hour and a half, and the choice of shooting from 10 or 20 yards.

On my first day at the range, my shooting was quite good for a beginner, surprisingly respectable. The second time, it was a lot more challenging, and I spent the whole time at the 10-yard line, working on improving my aim. It wasn’t until nearly the end of this session that I finally realized why the other archers kept going on and on about “groupings” and consistency. They really do want you to first learn to get all four arrows in the same place, then work on moving that place towards the bullseye. I’d instead been trying to make minute corrections each time to nudge my arrows towards the bullseye individually. But this meant I hadn’t really learned yet how to make an arrow go where I was aiming it, with precisely the same armhold, draw, sighting, and release. So next time I go, I’ll try that strategy: aim the bow so that the arrow appears to be touching some particular spot on the target, and shoot to hit the same place four times in a row. Then I can work on getting to the point-scoring locations!

One nice aspect of this repeat class was that, as one of the returning newbies, I got lots of individual attention and advice from the experienced folks. In terms of form, this includes:

  • Stand in an archer’s T.
  • Nock the arrow so that the colored vane points toward you (away from the bow). The arrow nocks just under the bead on the string, for reasons that escape me, but no doubt are primarily for consistency in position. (The bead doesn’t hold the arrow up; the nock sticks to the string itself.)
  • Draw to your smile: drawing hand comes back to rest touching your jaw, forefinger touching the outside corner of your mouth. It doesn’t have to be this exact point, but anything you can consistently hit.
  • Engage your back muscles in the draw, so it’s not all arms.
  • Hold the bow loosely, with thumb and forefinger only. It’s tempting to grip it hard because you’re pulling against it, but this can throw off the arrow’s flight as it leaves the bow.

At the end of either class, there is a balloon race. One balloon is pinned to each of the six-or-so targets on the field, and everyone lines up on the 20-yard line. We each get two shots to try to pop one of the balloons, everyone shooting at the same time. So the goal is to fire quickly but accurately (no good getting the right spot if someone else’s arrow gets there first!). Imagine my delight when, at the end of my second class, I hit one of the balloons with my first arrow! It had to have partly been luck; I’d been shooting from 10 yards the whole time and hadn’t had a chance to test out shooting from twice the distance. But still, it was a treat to get to walk up with the other winners and retrieve the $1 bill that had fallen from my balloon as a prize!

Disc golf

It’s like real golf… but somehow a lot more fun. There’s also less investment in equipment required, and no green fees.

How does it work? Like regular golf, there is a course laid out with numbered holes. You start at a tee-off spot and toss a disc towards the target, which is a metal basket with disc-stopping chains. Most mortals can’t throw a disc 200-400 feet and hit the target with a single throw, so instead you proceed to where your disc fell and make a second attempt from there, and so on. The lowest score wins!

My first experience with the sport involved a trip down to the local disc golf course with a friend, Ultimate Frisbees in hand. We quickly learned that real disc golfers don’t use frisbees, but instead an array of smaller, harder discs designed for the sport. The disc names, however, are borrowed from golf, so you have the heavy, blade-like driver and the soft, rounded-edge putter, with mid-range discs of hybrid qualities. I purchased a beginner’s set that included a Leopard driver, a Shark mid-range, and a Aviar putter. They definitely have different flight properties, and I’m gradually getting a sense of how they behave (helpful to peruse Innova’s 4-value disc rating system).

Because trees and other obstacles may be present between you and the target, there are a variety of useful disc golf throws that deviate from a straight-line throw. A “hyzer” shot will curve off to the left, and “anhyzer” to the right (if thrown RHBH, right-hand backhand). But it goes far beyond that, and there are also hook and roller shots to enable coping with various terrain challenges.

After playing a few courses, and attending a practice session with the OSU disc golf club, my putting has improved. I’m still working on consistency with my drives; sometimes I can get the Leopard to go just where I want it, and other times it goes completely somewhere else! My other big challenge now is distance; my longest throws are only about 40 yards (typical is more like 30 yards), and I’d really like to be getting about double that. More practice needed!

Older entries »