How to check your mail before you check your mail

Recently I discovered a new service offered by the Post Office called Informed Delivery. Once you sign up, the Post Office sends you a daily email around 8 a.m. that contains a PICTURE of each piece of mail that they plan to deliver to you later that day. It’s like getting to peek inside your mailbox from afar… no, it’s like peeking into the FUTURE of your mailbox, from afar!

My understanding is that this service came about because the Post Office already scans each piece of item for routing, so why not share the pictures with the recipients.

Why not indeed? I immediately had to wonder who would request this service. Maybe it’s for folks who suspect that mail is being stolen out of their mailboxes? Or just for those of us with an impatient streak?

Well, having signed up myself, I can now report on my experience. First there’s the signup process. Wow, that was onerous! In theory, you can verify your identity online. In practice, I apparently failed at least one security question (these are like the ones you have to answer to get a credit report, not questions you selected yourself) and then had to wait 72 hours (that’s three days) to try again.

On my next try, I failed again.

For those of us unable to authenticate online, you can do it in person at a participating post office. It’s not enough to show up with id; you also need a QR code that they email to you but mysteriously won’t display in my iPhone mail reader. (The message helpfully suggests that if the code won’t display, print it out instead.) Fortunately, doing a “save all images” from the message meant that the QR code plus 6 other doodads ended up in my Photos and I was able to get properly scanned and verified.

Now I get a mailbox email every morning! It’s great fun. And yet… it also takes a bit of the fun out of the evening ritual of opening the mailbox, not knowing what you’ll find. It remains to be seen whether I’ll continue the service or revert back to surprise mode. :)

GPS navigation in airplane mode!

Recently on a trip to Ireland, in an effort to reduce my cellular data consumption, I put my phone into airplane mode while driving across the country. Imagine my surprise when, an hour later, I checked my phone and found that it was still correctly reporting my location, and giving me directions!

I scratched my head about this for a little while. The moving map was updating my position even in airplane mode! It was also scrolling the map as I moved. So it must be the case that

  1. Google Maps downloads and caches enough information that it can continue to show you the relevant map info even if it loses a data connection to its server, and
  2. The GPS receiver in the phone continues to operate in airplane mode.

This had never occurred to me! I was able to confirm it at other times during the trip. If you try to get directions from Google Maps when in airplane mode, it doesn’t work – you can’t search the maps. But if you get the directions started, then go into airplane mode (i.e., turn off cell data), then it will correctly continue to give you directions. However, if you deviate at all, it cannot re-route you, so you have to figure that out for yourself.

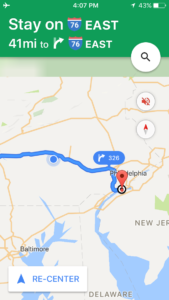
I decided to test this during a recent cross-country flight. Right before a flight from Los Angeles to Philadelphia, I got driving directions from Google maps (see right; it wants me to start on Sepulveda Blvd) and then I put the phone into airplane mode.

A few minutes after takeoff from LAX, we were out over the ocean and Google Maps was still urgently telling me to get onto Sepulveda Blvd:

I checked on the directions periodically throughout the 5-hour flight.

Each time we had made some more progress, but we were so far off the (road) track that Google Maps kept saying to go back to Sepulveda Blvd and start over.

As we got close to the Philadelphia airport, we were close enough to match up with a road (briefly) and the directions made more sense.

So cool! This means that even when an airplane doesn’t bother to give you that awesome moving-map track of where the plane currently is, you can still get it, IN AIRPLANE MODE, on your phone! (But only if you got some directions first.)

How to drive a steam locomotive

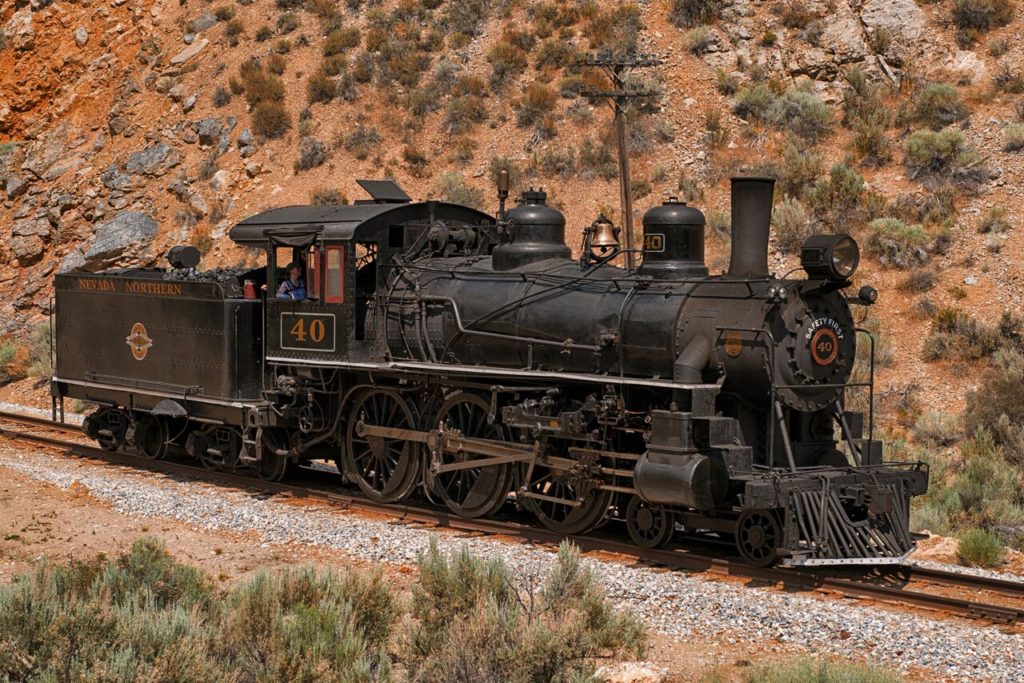
I recently got to drive a steam locomotive! The Nevada Northern Railway in Ely, NV, allows you to Be the Engineer for a 14-mile trip up and down hills, through two tunnels, and across several road crossings. This is an incredible experience – visually and physically!

(By the way – I learned that you “run” or “operate” an engine, not “drive” it, since no steering is involved. But that is how they describe the experience to newcomers :) )

Did you ever see such a beautiful engine?


NN 40, built by Baldwin in 1910

Before climbing into the engineer’s seat, I had to study a 122-page rulebook and take a short (open book) exam. I learned about whistle signals, hand signals, speed limits, track warrants, air brakes, and more. I learned radio protocol (interestingly, it’s backwards from typical airplane conventions; you announce who you are and then who you want to speak with, e.g., “NN 93 to NN Conductor 93, over”). In addition, “the use of ten codes” (I assume this means things like “10-4”) is prohibited.

I also helped get the engine ready for action. The rest of the crew gave me small jobs, like greasing the many bolts that connect rods and other pieces, and refilling the oil reservoirs. Meanwhile, they stoked up the fire in the boiler, cleaned the engine, filled up the tender’s 6000-gallon water tank, and ensured we had enough coal. The steam engine goes through 75 gallons of water *per mile* and consumes about a ton of coal in the 14-mile trip we did!

After three hours of prep, the engine was ready to go! I climbed up into the cab and learned how to start and stop the engine, then practiced this while we were still in the railyard.

The primary controls are the throttle and the brake. The throttle is a squeeze lever with many (~20) detents. Bouncing along, it requires some fine eye-hand coordination to move it precisely to the desired notch. It, too, is backwards from the throttle on an airplane: moving it out (towards you) gives you more steam, not less!

The brake is a smaller handle, easier to manipulate. If you want to slow down, you move it to a setting that allows compressed air into the brake cylinders, pressing the brake shoes against the wheels. You monitor how much brake you are applying through a pressure gauge. Then you move the handle the other direction to release the compressed air (you can hear it hiss out) and the wheels resume unimpeded motion.

The massive locomotive responds slowly to control changes, so both controls are best applied with careful anticipation of the upcoming track – its grade, any curves, preparation for tunnels, etc.

There is also a reversing lever that is mounted vertically in the floor. As one of my books warns, “A strong arm is needed for the reversing lever!” It has a more subtle effect on locomotion by altering the amount of steam that gets into the piston cylinders on each stroke. You want it set full forward to get moving, then back it off for “cruise” to achieve more efficient operations.

And we were off! We left the railyard and climbed a gentle hill. We went through two tunnels and several road crossings. For each crossing, I blew the whistle – LONG LONG short LONG! Mike, our fireman, was busy shoveling coal as needed, injecting more water into the boiler, and ringing the bell through all crossings as well. What a delightful noise!

We used a GPS-based speedometer to track our speed, which stopped working each time we went into a tunnel. However, after a while you get a feel for speed based on the sound of the pistons (and such a lovely sound it is). Pistons mounted on each side provide the driving power for the large wheels. Each wheel gets driven twice per rotation (unlike engines in cars, airplanes, etc.):


In addition, the left and right wheels are offset in phase so that one side gets maximal torque when the other is at minimum (end of its stroke). So what you hear is CHUFF-chuff-chuff-chuff as the pistons go right-forward, left-forward, right-back, left-back, for a smooth continuous overall motion.

At the top of the hill, I gave the controls over to John, the engineer who was training me, and he traced our way through a “wye” (track set up to enable a three-point turn by an engine), which got us set up to return back downhill.

We then continued back down the hill to return to the railyard. The whole trip took about an hour and 15 minutes. After the initial learning curve, it got very comfortable to roll along and listen and respond to the chuff of the pistons as needed. My mind quieted and I filled up with the pure joy of the moment. What an overwhelming experience!

Me driving Number 40

Thank you to Richard Ondrovic for taking these fantastic photos!

A new use for human corpses

Here’s a neat idea – use composting techniques to take care of our own dead bodies.

In this TED talk, Katrina Spade makes a compelling argument for a new way of managing the corpse part of dying. I’ve long been a fan of cremation over burial, for the reasons she explains, but she also makes good points about the downside of how cremation consumes a lot of energy and generates, effectively, human ash pollution.

The idea of “re-composing” bodies, in ways that allow your molecules to be broken down and eventually used to nurture new life, is refreshing! I also like the idea that bereaved family and friends can have whatever kind of ceremony they like as part of the send-off of the body. For those who like to visit gravesites in remembrance of those who are gone, why not designate a location of positive memories with the deceased (a favorite beach or park, or the site of a graduation or wedding proposal or other significant event), or even have a shrine set aside inside the home (I’ve always liked this idea anyway).

Wired wrote an article about this last year that contains some diagrams about how the envisioned recomposition center would look and operate: Inside the Machine that will turn your Corpse into Compost

And for the current status of the project, check out Urban Death Project (a slightly more creepy name than “Urban Recomposer” or other alternatives). They already demonstrated success in composting six cadavers, and it looks like they are starting the next pilot project this month. This will be fascinating to follow!

How to take apart an engine

Today I got to take apart an engine… and put it back together.

I attended a training class in small engines. Our idea is that this could be a great workshop for Kids Building Things. Getting to take apart an engine in middle school? Wouldn’t that have been awesome?

As it turns out, this class was also an unexpected refresher in basic engine knowledge that relates to my pilot training! We discussed 4-stroke combustion engines, why water in the fuel is bad, and what pre-ignition and detonation are. The plane I fly has a 4-cylinder air-cooled engine. The one we got to take apart in this class was a single cylinder, also air-cooled. I think it is the type of engine you’d use in a lawn mower.

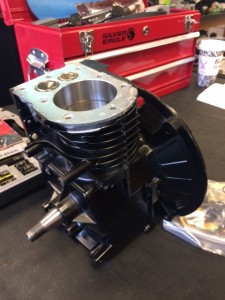
EngineHere is the engine before we started disassembling it. The piston is in the big shiny hole at the top. The fuel/air mixture and exhaust valves are the smaller circles on the top. The shaft sticking out goes to the magneto/flywheel system (not shown) and the other end of that axis is the drive shaft (to actually do the work you want to achieve with the engine). The black radial looking part is the oil pan. In normal operation, that should be at the bottom, so this is a vertical mount engine, and it could (for example) spin a lawn mower blade).

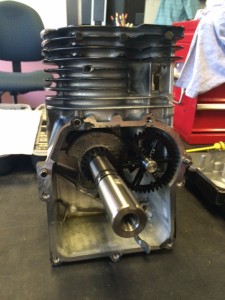
UncoveredWe worked in pairs on our engines. After removing the oil pan, you can see the drive shaft (long cylinder pointing out) and the cam shaft (small plastic gear on the right). The cam shaft gives the valves their timing so they open and close at the proper points in the 4-stroke cycle.

Our instructor drilled us through the intake-combustion-power-exhaust process, which was nicely illustrated when you hand-turned the drive shaft and could see the piston go up and down and the valves open and close in synchrony.

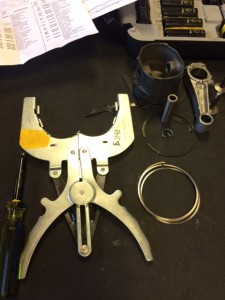
Ring spreaderThen he had us extract the piston from its cylinder. It has three sets of pressure rings that help give it a good fit in the cylinder and also (apparently) wipe oil down from the cylinder walls. There is a really awesome tool called a “ring spreader” that allows you to easily remove and replace these thin metal rings. At right you can see the tool with some rings next to it. The dull grey slightly oval shape sitting above the rings is the piston head, with its disconnected shaft to its right. The piston itself is round, but underneath they apparently tweaked the shape to use less material (reduce weight) which is why it isn’t quite round.

We then removed the valve assemblies, including the springs. By then we were left with a metal block that did nothing. We then put all of the pieces back together. Re-installing the valve springs was definitely the trickiest and fiddliest part – my partner and I took several attempts before we got it (success!).

In a longer class, apparently you get to put your engine on a mount and fire it up! Seeing it run after you’ve taken it apart and put it back together must be really satisfying. But even without that, I can now see how you would go about getting in there and replacing a worn part. It’s not such a mystery. And now I understand a bit more about what probably happened when my ’86 Nissan Sentra’s timing belt broke. No wonder it was a major repair!

« Newer entries · Older entries »